In Futoshiki, a chain of three increasing cells on a 4×4 board tells you more than either sign alone. The smallest cell can only be 1 or 2, the middle one 2 or 3, and the largest 3 or 4. A number already in a crossing column may then settle all three.
This is useful when you can read the signs but still seem to have too many choices. Work out the space each cell needs above and below its value before filling every empty square with notes.
The number range depends on the board: use 1–4 on a 4×4, 1–5 on a 5×5, and so on. Each number appears once in every row and column. There are no Sudoku boxes. A comparison's pointed end faces the smaller number; its open end faces the larger one. For example, 1 < 3 is allowed. The sign does not require the numbers to differ by exactly one.
Follow the comparisons, even around a corner
Read the three cells in Figure 1 as A < B < C. The chain bends, but each step still goes from a smaller value to a larger one. The vertical sign points up toward B, so B is smaller than C below it.
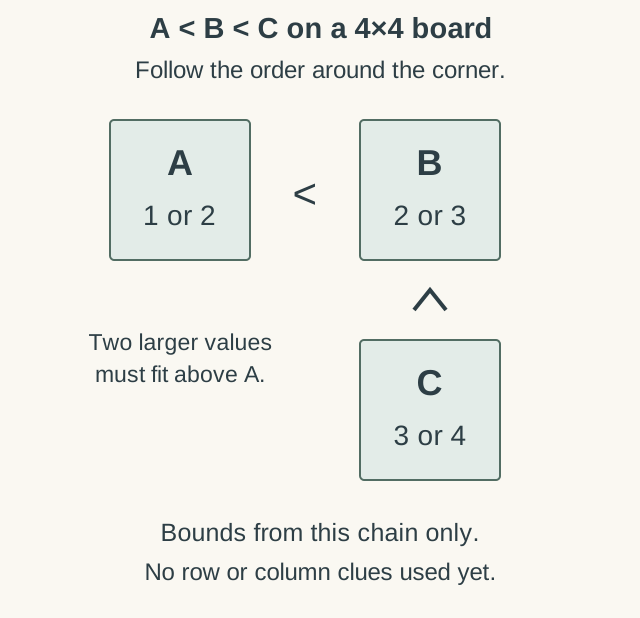
C needs two smaller numbers below its value, so it cannot be 1 or 2. A needs two larger numbers above its value, so it cannot be 3 or 4. B needs one on each side, which excludes both extremes.
The possibilities for A–B–C are 1–2–3, 1–2–4, 1–3–4 and 2–3–4. Those four triples explain both the bounds and their limit: the chain has not yet fixed a single number. In particular, 1–2–4 works just as well as 1–2–3 under these comparisons.
On a 5×5 board, a three-cell increasing chain is looser: its smallest cell may be 1, 2 or 3. Count against the board's actual maximum rather than carrying the 4×4 notes into a larger puzzle.
Let a crossing column choose the triple
Here is an original 4×4 practice board. The printed clues are 1 at row 2, column 1; 2 at row 3, column 3; and 3 at row 4, column 4. Its two signs connect A at r1c1 to B at r1c2, then B to C at r2c2, just as in the local chain.
A's column already contains 1. Remove that option from A's chain bounds of {1, 2}: A is 2. B must exceed 2 and leave a still larger value for C. Only B = 3, C = 4 fits.
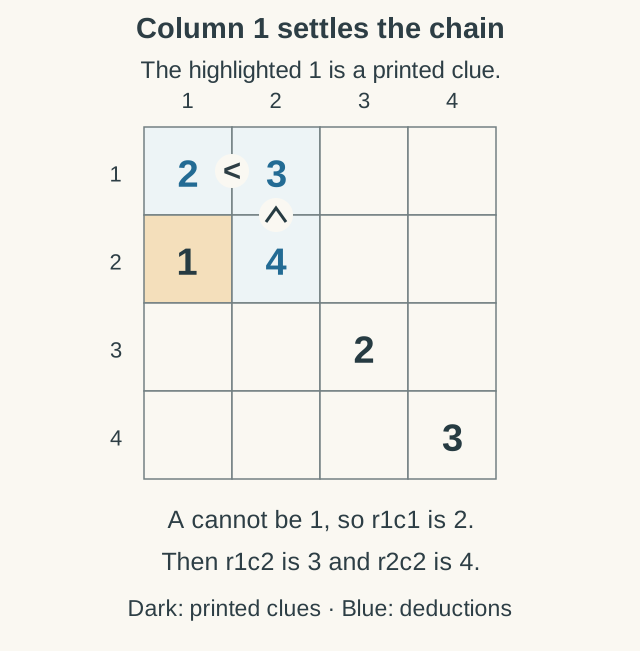
The chain did not become consecutive because its signs demand a difference of one. It became 2–3–4 because starting at 2 leaves just those three values available. Keeping that reason clear matters on a larger board, where gaps may remain possible.
For another Futoshiki board, look for a printed number in a column crossing a short chain. It can remove an endpoint choice without your having to try a whole solution.
Finish two cells without another sign
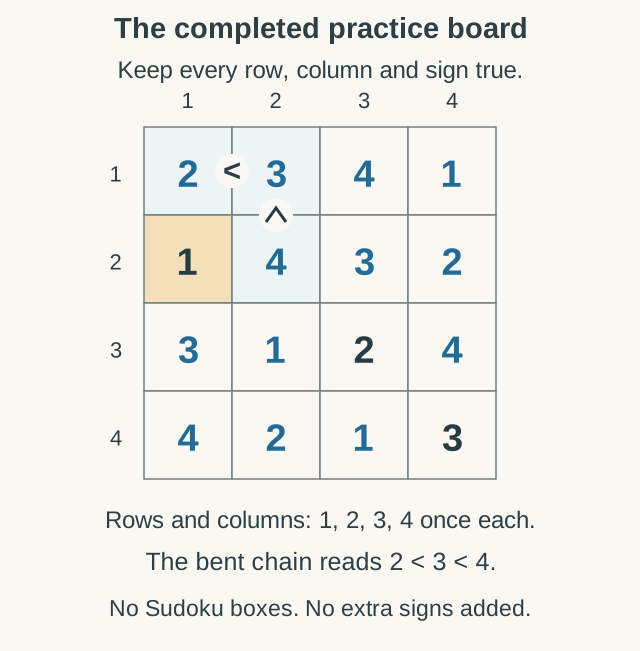
Use the board in Figure 2. What goes in r2c4, and what goes in r3c2? Rows are counted from the top and columns from the left. Keep the two printed clues near the bottom in view.
Show the two deductions and finished board
Row 2 already has 1 and 4, so its two empty cells need 2 and 3. Column 4 already has a printed 3 at r4c4. Therefore r2c4 = 2, and r2c3 gets 3.
Column 2 contains 3 and 4, leaving 1 and 2 for its lower cells. Row 3 already has its printed 2 at c3, so r3c2 = 1.
From there, r3c4 is 4: column 4 excludes 2 and 3, while row 3 excludes 1 and 2. Row 3's remaining cell, c1, is 3. Columns 1 and 2 then give r4c1 = 4 and r4c2 = 2. Row 4 needs 1 at c3; column 3 gives r1c3 = 4, leaving r1c4 = 1.
A change of direction breaks the increasing chain
A < B > C says that B is larger than both neighbors. It gives no order between A and C. If those two cells share neither a row nor a column, A = 1, B = 3, C = 1 satisfies the comparisons. The repeated 1 is allowed because the cells do not share a line.
Do not count that shape as three increasing numbers or insist that B must be at least 3. The comparisons alone also allow A = 1, B = 2, C = 1 under the same separate-row-and-column condition. Row and column restrictions may add more information; the branching signs alone do not.
When writing Notes, combine the chain bounds with the numbers already in the cell's row and column. A range from one chain is not a finished candidate list. GridPuzzles' rules and controls show how to enter and remove notes.
Watch a complete solve
PuzzleTeam's walkthrough applies the row, column and comparison rules to a separate Futoshiki board. The practice board above is independent of the video.
Watch the PuzzleTeam walkthrough on YouTube.
For further worked explanations, see the chain and combined-rule sections of Futoshiki.com's solving guide and Puzzler's Futoshiki tips. Those sources explain the same principles on their own boards.