In a two-star Star Battle puzzle, test a tempting square by asking where the second star could go. If the first star would touch every other available square in its region, cross it out. You have found a useful move without guessing a star.
Start with a small region or a nearly filled row. Count places that can hold stars together, rather than counting empty squares. Six empty squares can offer fewer possibilities than they seem to.
On GridPuzzles Star Battle, the 8×8 boards need one star in each row, column and colored region; the 10×10 boards need two. The examples below are for two-star puzzles. Every pair of stars must be separated: sharing an edge or a corner is forbidden. These are local practice diagrams, not complete puzzles. Unshown rows, columns and neighboring regions may narrow the choices further.
A six-square region can rule out its middle
Suppose one whole region is a rectangle two rows high and three columns wide. It needs two stars. Label its columns A, B and C, and its rows 1 and 2.
A star in B1 touches all five other cells. So does a star in B2. Either placement would leave nowhere for the region's second star. Mark both middle cells ×.
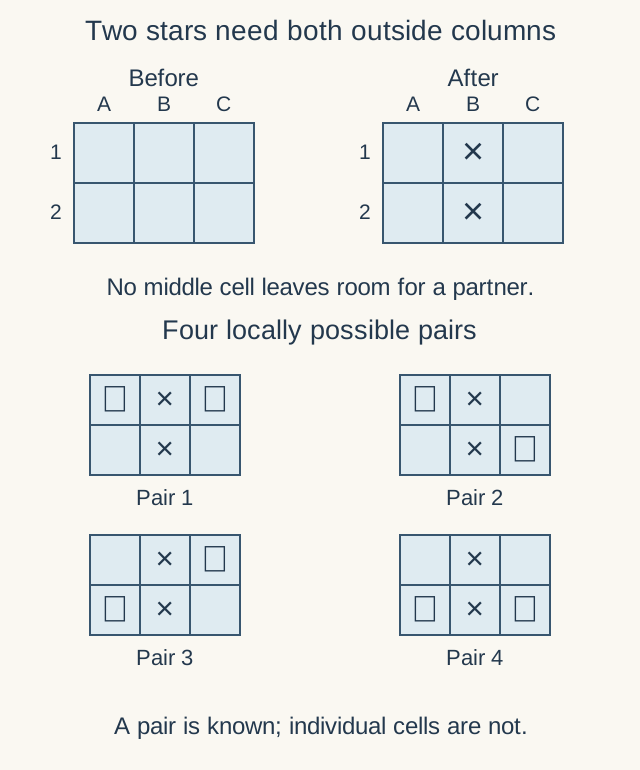
The two surviving cells in A touch each other, so that column can hold at most one star. C has the same limit. Since the region needs two, it must use both outside columns. You still cannot choose the upper or lower cell in either one.
This is the distinction that prevents many premature placements: one star somewhere in a pair is useful information, but neither square is a confirmed star. Keep the pair open until a crossing row, column or neighbor supplies another reason.
Use a four-square block to force a tail
Any 2×2 block holds at most one star: whichever cell you pick touches the other three. This is true across colored boundaries too. A drawn 2×2 box is a way to count capacity, not a new puzzle region.
Consider the five-cell region below. Four cells make a 2×2 block, and one tail cell sits below its right-hand column. The region needs two stars. The block can supply only one, so the tail must supply the other.
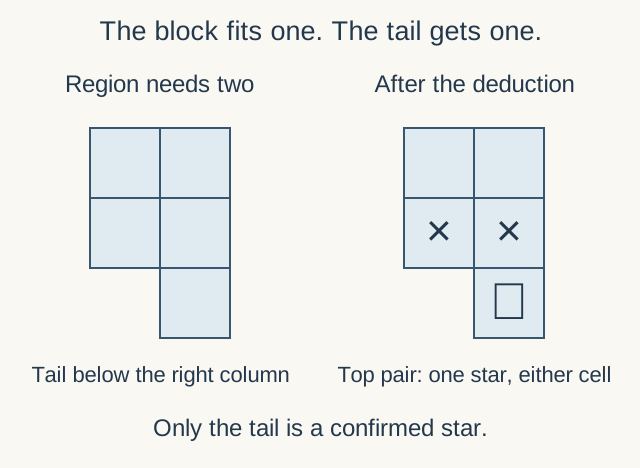
Check the two stages separately. First, capacity forces the tail. Then the no-touching rule removes its neighbors. The top-left and top-right choices both survive the local test, so leave them unresolved.
Do not automatically put one star in every 2×2 box you draw. A box has at most one. It has exactly one only when a count proves that it must contribute one, as this region does. An arbitrary box elsewhere on the board may contain none.
A row exercise: which star is certain?
A row needs two stars and has none yet. Its only available cells are columns 2, 3 and 6; every other cell in the row has already been ruled out correctly. Which cells can you settle from that information alone?
Show the answer and its limits
Column 6 is a star. Columns 2 and 3 touch, so they cannot supply both required stars. One must come from that pair and the other from column 6. The two locally possible pairs are {2, 6} and {3, 6}.
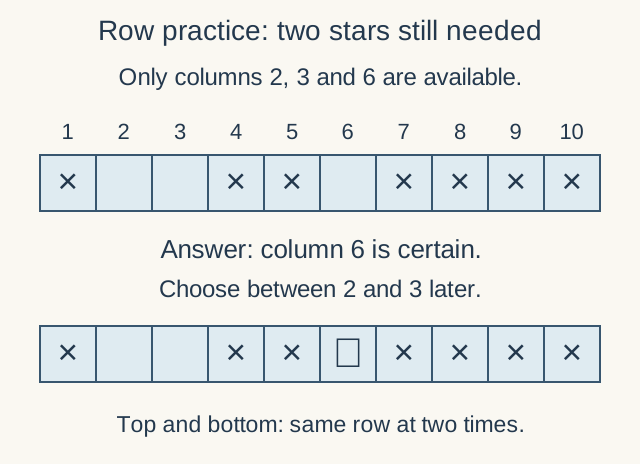
Neither column 2 nor column 3 can be crossed out using the row alone. Their columns and regions may decide later. If the only two available cells had instead been columns 2 and 3, the row would be impossible: two open squares are not enough when they touch. Recheck earlier marks rather than placing both.
What to check after a forced star
Mark its immediate neighbors ×, including diagonal neighbors. Then check the row, column and region that received it. When any of those has both its stars, all its other cells are ×. On GridPuzzles, Auto × handles those direct exclusions; the rules and controls explain the marking cycle.
Revisit a region whose available space has just shrunk. It may now look like a small block with a tail, even if its original colored outline was much larger. Use the cells still available and subtract any stars already placed in that region. A region needing one more star does not need the two-star capacity argument above.
If no such step appears, keep an unresolved pair as a pair. These patterns offer justified moves when their conditions occur; they do not promise to solve every board. For a first attempt, use the one-star boards to learn the controls, then try the two-star level and look for one exclusion you can explain.
Watch a two-star solve
Krazydad's walkthrough shows the same two-star and no-touching rules in a complete puzzle. Its board is separate from the small practice diagrams here.
Watch Krazydad's tutorial on YouTube.
The capacity arguments are also explained in Krazydad's introductory tutorial and the 2×2 and exclusion sections of Kris De Asis's Star Battle guide. The diagrams here were drawn separately for this article; they do not reproduce either source's puzzle.