A hidden single is a digit with only one possible cell in a row, column or box. Cross-hatching helps you find one by ruling out rows and columns that already contain that digit. A naked single asks a different question: which digit is the only one that fits this cell?
The hidden single's cell can still have several pencil marks. A cell marked 1, 4, 5, 8 can be a certain 4 even though three other digits appear to fit. You need to look at the rest of its row to see why.
The two checks below use the same starting grid. You can follow them without completing the puzzle. Coordinates such as r1c2 mean row 1, column 2, counted from the top left. The blue letters mark empty cells; they are not clues.
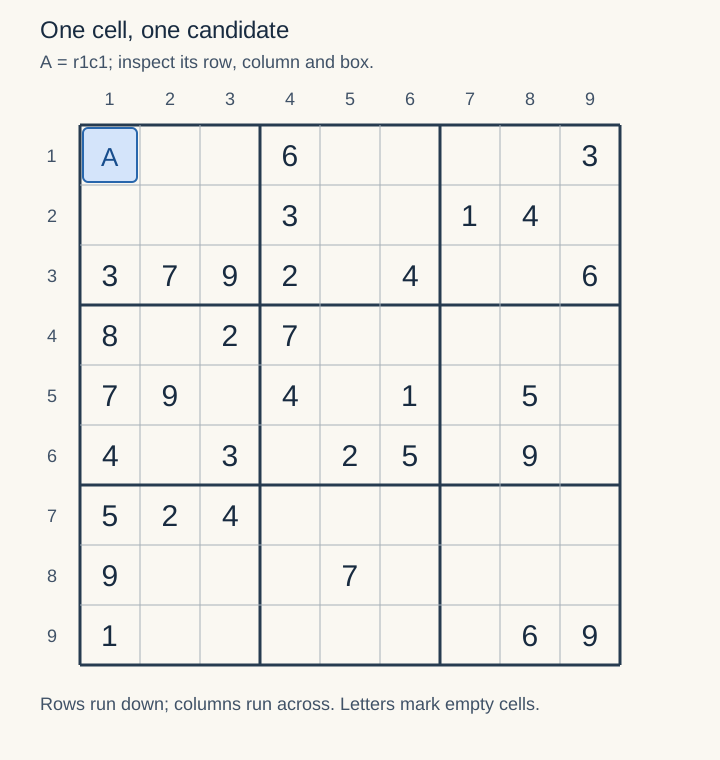
A naked single: ask what can go in this cell
Look at A, r1c1. Begin with the digits 1–9, then rule out digits already present in its row, column and 3×3 box.
| Check | Digits already present | Digits still possible after this check |
|---|---|---|
| Row 1 | 3, 6 | 1, 2, 4, 5, 7, 8, 9 |
| Column 1 | 1, 3, 4, 5, 7, 8, 9 | 2 |
| Top-left box | 3, 7, 9 | 2 |
The column would allow 2 or 6 in an empty cell, but the row already has a 6. A must be 2. Nothing else fits that cell, so this is a naked single.
You have not guessed a value and checked whether the puzzle works out. You have excluded every other value using visible clues. Nor is this simply the last empty cell in a row: row 1 still has seven blanks.
Pencil marks help only if they are complete and current. A lone handwritten 2 is not proof if you forgot to test the other digits. If a cell has no candidates at all, check for an earlier mistake rather than forcing a number into it.
A hidden single: ask where this digit can go
Now return to the unchanged starting grid. Leave A empty for this comparison and look at B, r1c2.
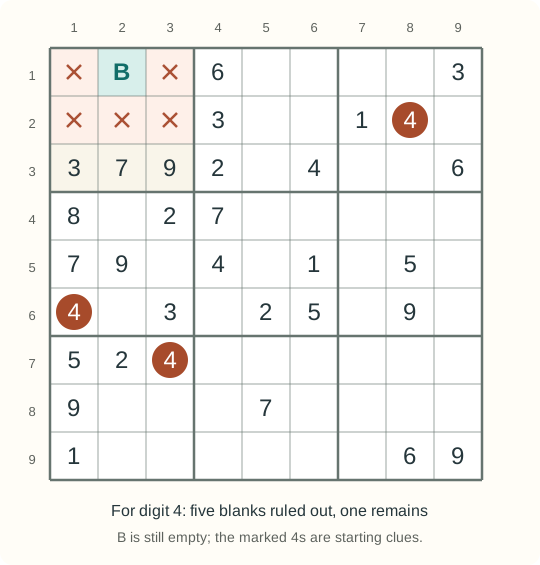
B's candidates are 1, 4, 5, 8. That is not a naked single. Here are the complete candidates for every empty cell in row 1, using only the starting clues:
| Empty cell | Candidates |
|---|---|
| r1c1 | 2 |
| r1c2 (B) | 1, 4, 5, 8 |
| r1c3 | 1, 5, 8 |
| r1c5 | 1, 5, 8, 9 |
| r1c6 | 7, 8, 9 |
| r1c7 | 2, 5, 7, 8, 9 |
| r1c8 | 2, 7, 8 |
Row 1 has a 3 and a 6 already. It still needs a 4, and B is the only empty cell in the row that permits 4. Therefore B must be 4. Its other three candidates can be removed.
The word “hidden” describes the 4 among B's other pencil marks. It does not mean you need to look ahead or make a more daring move. The proof is simply about a digit's remaining positions instead of a cell's remaining digits.
This also works in columns and boxes. Always name the unit you checked: “4 has one place in row 1” is a complete reason. “There is only one 4 written on my screen” is not, unless the relevant notes are complete.
Cross-hatching: find the same 4 without a full note list
Pick one digit and one 3×3 box. Use that digit's filled rows and columns to rule out positions inside the box. You are looking for one surviving cell, not one surviving note in a cell.
Return to the unchanged starting grid and scan for 4 in the top-left box:
- r2c8 already contains 4. Row 2 cannot take another, so cross out r2c1, r2c2 and r2c3.
- r6c1 contains 4. That rules out r1c1 in column 1.
- r7c3 contains 4. That rules out r1c3 in column 3.
The bottom row of that box already contains 3, 7 and 9. Five empty cells have been ruled out, leaving B, r1c2, as its only place for 4. This is the same placement proved by the row table, found by scanning visible clues instead of writing every candidate first.
If two cells survive, scan another digit or box. This scan has not supplied a placement yet.
What to scan when neither jumps out
For a naked single, pick a cell whose row, column and box contain plenty of different digits. Check all three together. Counting the blanks in just its row can miss an easy move.
For a hidden single, pick a digit missing from a row, column or box. Cross off positions blocked by that digit in the intersecting units. If one position survives, you have your placement. You do not need to work out every other candidate in that cell first.
Neither technique is a promise that the next move will be obvious. A placement can create another single, so update the affected notes and check again. If accurate candidates leave no singles, another technique may be needed. A move can also satisfy both definitions; the labels describe a proof, not two exclusive kinds of cell.
If you are still learning the row, column and box rules, the Sudoku rules and first steps are a better starting point than memorising more technique names.
Try it on a fresh grid
Use the grid exactly as shown. Check A, B and C before filling in any of them.
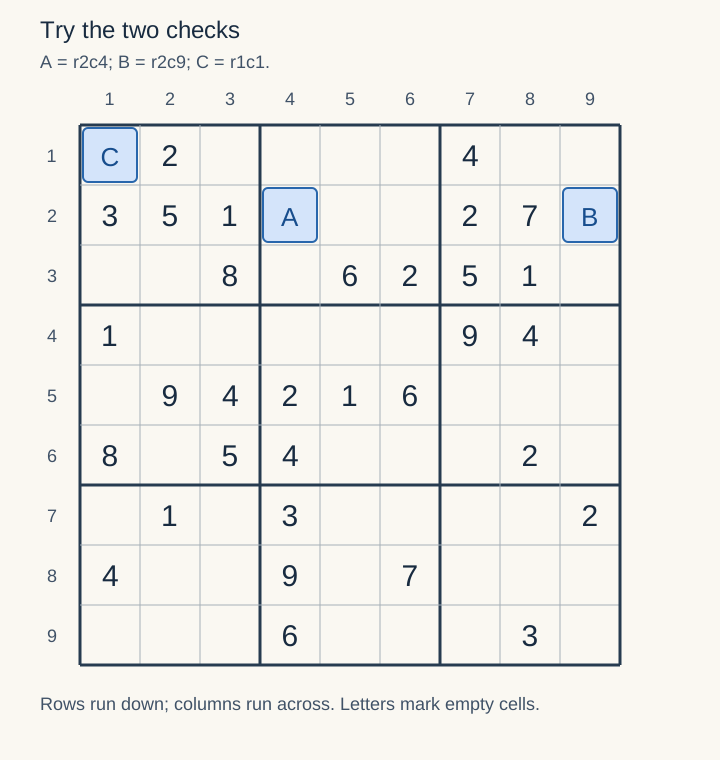
- What must go in A, r2c4?
- B has candidates
6, 8, 9. Why must B, r2c9 be 6? - C has candidates
6, 7, 9. Does that alone make C, r1c1 a single?
Show the reasoning
A is 8, a naked single. Row 2 is missing 4, 6, 8 and 9. Column 4 already contains 4, 6 and 9. The top-middle box does not rule out 8, so 8 is the only remaining candidate.
B is 6, a hidden single in row 2. The row's empty cells have these candidates: r2c4 = 8; r2c5 = 4, 8, 9; r2c6 = 4, 8, 9; r2c9 = 6, 8, 9. Only B permits 6.
C is neither kind of single at this starting position. It has three candidates, and none of those digits has C as its only position in C's row, column or box. That does not make C permanently unsolvable; the grid has not been updated yet. Do not choose one of its candidates just because A and B were straightforward.
Try the same two questions in a new Sudoku puzzle: “What can go here?” and “Where can this digit go?” Keeping those questions separate is often enough to make the distinction clear.
A video demonstration
Sudoku.com's Hidden singles — a Sudoku technique for beginners offers another visual explanation of the hidden-single idea. The worked grids above stand on their own; you do not need the video to check the moves.
Further reading
HoDoKu's singles reference distinguishes full houses, naked singles and hidden singles. Conceptis's Sudoku techniques shows how scanning rules out positions. The grids and worked examples in this article were made for this lesson.